
Optimize your Amazon Affiliate Earnings
What if you could peer into a crystal ball and see exactly what links and products on your page get clicked the most?
Alchemy Coder here, and I want to share with you some digital alchemy (affiliate link tracking) that helps me personally put more money into my bank account every single day. Tracking my Amazon affiliate link clicks.
You see, I have a magical crystal ball.
If you had access to this magical crystal ball:
- You could see if more people are clicking on your image links or text links.
- You could see which in a group of products is the most popular.
- You could see if your CTA buttons even get any clicks at all.
- You could see if your showcase gets more clicks at the top or bottom of your post.
- You could see which products in your comparison table received the most clicks.
- You could see if google traffic or Facebook traffic was clicking your links more often.
- You could see your earnings soar as you optimize based on this hidden information!
I’m guessing right now you have NO IDEA how to see all of this information for yourself with absolute certainty.
(How are you going to compete with affiliates like us collecting, analyzing and optimizing knowing all of this?)
Table of Contents
* Only works with Universal Analytics Web Properties. Support for Google Analytics 4 Properties is not yet available.
- Part A: So what exactly does AmaLinks Pro® track?
- Events that are tracked with AmaLinks Pro®
- Real-life examples of event data being tracked
- Part B: How to Set up Google event tracking in AmaLinks Pro®
- Step 1: Install Google Analytics
- Step 2: Verify your Google Analytics Tracking Code is Tracking Properly
- Step 3: Activate Event Tracking in your AmaLinks Pro® Settings
- Step 4: Testing the AmaLinks Pro® Auto Event Tracking in Google
- Part C: Exactly how to use this event data to optimize your pages and earn more.
- Step 1: Accessing your Event Data in Google Analytics
- Step 2: Digging a Little Deeper – the Event Action
- Step 3: A Goldmine of Information – the Event Label
- One More Piece of Important Data I see hiding…
- Part D: Ideas, Optimizations & Insights – How to Get the Most Out of your Crystal Ball
- Ideas on optimizing all of your pages and posts
- Ideas on optimizing your comparison tables
Let’s gaze into this crystal ball together so you can see the secrets to having the highest click-through-rates …
Later in this article I will share exactly what I do with this data to ytrack affiliate sales in Google Analytics and ultimately increase my CTRs & Conversion Rates. And it’s easy.
Part A:
Tracking Amazon Affiliate Links: So what data does AmaLinks Pro® track?
It’s the middle of the night, and a new visitor from Los Angeles, USA lands on your beautiful new product review after seeing it listed in the Google search results. It’s exactly what they are looking for.
After scanning your review for a lengthy 45.438 seconds, they decide to take a look at your slick product showcase. They click on the product image, which happens to have an affiliate link wrapped around it and they are whisked away to Amazon.
ZZZZZiiiiiiiPPPP … at that very moment in time, a tiny electrical signal is sent across the world and lands right in your Google Analytics account. It happened so fast nobody even noticed it – and your visitor was none the wiser.
Did this specific user buy something on Amazon earning you a commission? You may never know … but that’s not important.
There are greater powers at work here.
It’s a small piece of affiliate link tracking data, and to the untrained eye may not seem to tell you very much. So what, somebody clicked the link in my showcase, duh.
But the secret is when you combine this data with the clicks of all your visitors. You get a large set of detailed data that you can combine with other data, and make amazing and often surprising discoveries about what your visitors are actually interested in.
This leads to ACTIONABLE ideas you can implement to get the highest click-through-rates and conversion rates possible.
It’s powerful, but you have to know what to look at. You see, not all data is created equal.
Let’s take a look at exactly what AmaLinks Pro® event tracking tracks.
Every event AmaLinks Pro® sends to your Google Analytics account has 3 components. These have a hierarchical structure.
- Category – We send over the Page ID and the Page Title. This is our highest level of organization. By tracking the page the visitor viewed as the top level, you will be able to collect data on all link types that were clicked on that page.
- Action – This tells you whether the user clicked a text link, image link, CTA button, Showcase link, or comparison table link.|
- Label – In the label, we send over some important information about exactly what was clicked, such as the ASIN, link text, or image alt tag. This varies by link type.
- Action – This tells you whether the user clicked a text link, image link, CTA button, Showcase link, or comparison table link.|
Now let’s take a look at all of the events that are tracked for AmaLinks Pro®
Text Links
Category: ID# 123 – Your Page Title Here
Action: Text Link Click
Label: Link Text: XXXXXX, ASIN: XXXXXXXXX
Category: ID# 123 – Your Page Title Here
Action: Image Link Click
Label: Image Alt Tag: XXXXXX, ASIN: XXXXXXXXX
CTA Buttons
Category: ID# 123 – Your Page Title Here
Action: CTA Button Click
Label: CTA Button: XXXXXX, ASIN: XXXXXXXXX
Showcases
Category: ID# 123 – Your Page Title Here
Action: Showcase Title Link Click
Label: CTA Button: XXXXXX, ASIN: XXXXXXXXX
Category: ID# 123 – Your Page Title Here
Action: Showcase Image Link Click
Label: CTA Button: XXXXXX, ASIN: XXXXXXXXX
Category: ID# 123 – Your Page Title Here
Action: Showcase Bottom Button Click
Label: CTA Button: XXXXXX, ASIN: XXXXXXXXX
Category: ID# 123 – Your Page Title Here
Action: Showcase Opened Reviews
Label: CTA Button: XXXXXX, ASIN: XXXXXXXXX
Category: ID# 123 – Your Page Title Here
Action: Showcase Closed Reviews
Label: CTA Button: XXXXXX, ASIN: XXXXXXXXX
Category: ID# 123 – Your Page Title Here
Action: Showcase Opened Disclaimer Popup
Label: CTA Button: XXXXXX, ASIN: XXXXXXXXX
Category: ID# 123 – Your Page Title Here
Action: Showcase Closed Disclaimer Popup
Label: CTA Button: XXXXXX, ASIN: XXXXXXXXX
Category: ID# 123 – Your Page Title Here
Action: Comparison Table Link Click
Label: Table ID# XXXXXX, Row: XXX, ASIN: XXXXXXXXX, {column_type} column, Clicked Link
Category: ID# 123 – Your Page Title Here
Action: Comparison Table Link Click
Label: Table ID# XXXXXX, Row: XXX, ASIN: XXXXXXXXX, {column_type} column, Clicked CTA Button
Category: ID# 123 – Your Page Title Here
Action: Comparison Table Sorted Column
Label: Table ID# XXXXXX, Column: XXX
Category: ID# 123 – Your Page Title Here
Action: Comparison Table Pagination Click
Label: Table ID# : Page {page_number}
Here is a real-life example of event data being tracked on one of our real posts.
This tells me what page the visitor was on, what type of affiliate link they clicked, where the link was and the product ASIN of the link. This is all very useful data when combined with other visitor’s event data.
Once you collect enough of it, you start to see patterns emerge and can easily figure out what products, link types and link placements get the highest CTRs, conversion rates, and overall most interaction.
Category (page the event happened on):
ID# 7571 – Coleman Classic Propane Stove Review (AmaLinks Pro® with Elementor)
Action (type of link click):
Comparison Table Link Click
Label (details about exact product link):
Table ID# 2013, Row 3, ASIN: B0006VORDY, image column, Clicked Link
I mentioned earlier the data for one particular event is not very complicated, and you can see that here. Alone, this doesn’t help us very much. It needs to be combined with many other events, over time and then combined again with other data to be useful.
Keep reading to see exactly how to make the right data combinations & insights – and peer into your visitor’s psyche through your own crystal ball.
Part B:
[Tutorial] How to Set up Google event tracking in AmaLinks Pro®
For those of you that are already AmaLinks Pro® Members – Here is how to get all set up and tracking your affiliate click events to outsmart your competition – the people reading this not using AmaLinks Pro® 🙂
Step 1: Install Google Analytics
* If you know you have Google Analytics installed, you can skip this step, but come back to troubleshoot if your event tracking is not working.
Log into your Google Analytics and set up a Property for your website if you have not already. There are many tutorials online if you need help with this step.
Then add the tracking code to your website in your preferred way. You can either paste this code into yourtag or use a plugin such as Google Analyticator to add the tracking code to your site.
![]()
AmaLinks Pro® Auto Event Tracking works with either the latest and standard gtag.js as in the example above but also works with the legacy analytics.js tracking code as well. We recommend using the gtag.js version as that is what Google recommends.
Step 2
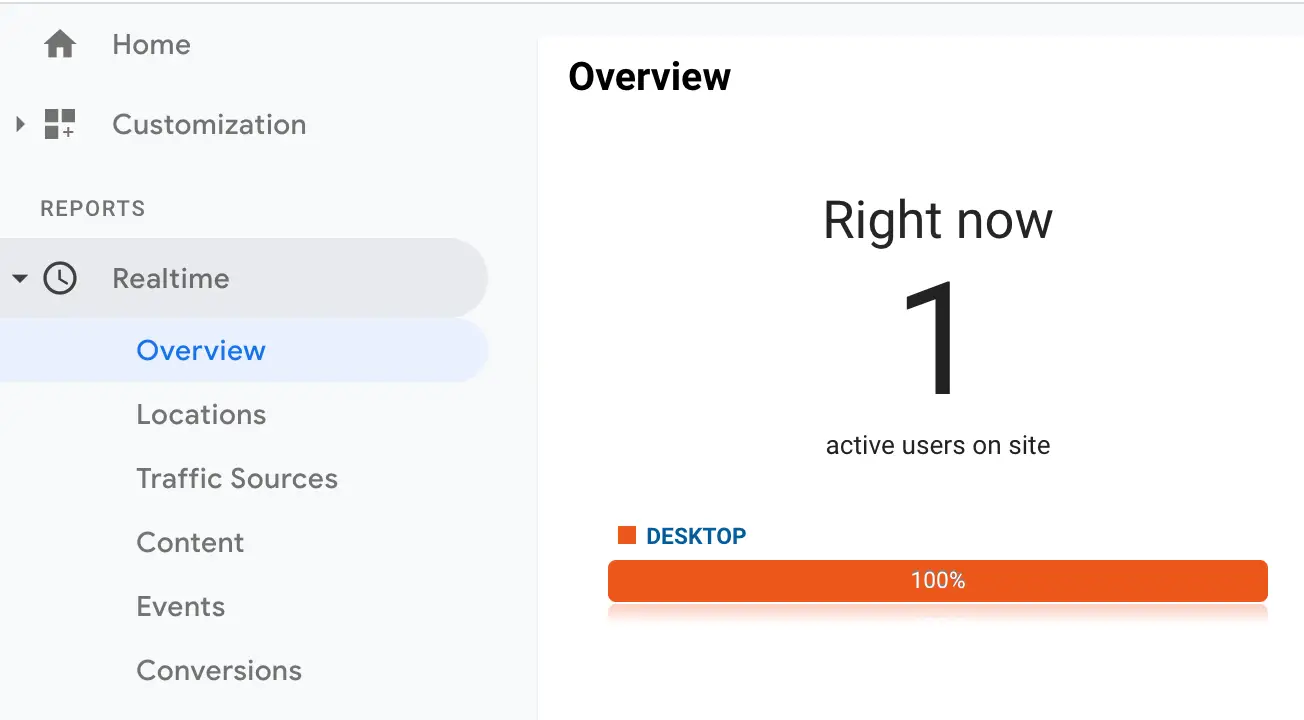
Step 2: Verify your Google Analytics Tracking Code is Tracking Properly, and test out Real-time Analytics
To test if your Google Analytics is tracking properly, visit the Real Time > Overview page and you should see yourself there and be tracking at least 1 visitor.
Don’t see anything being tracked in the real time analytics?
If you are using the Google Analyticator plugin mentioned above, it may be set to not track logged in admin users. If this is the case, log out of your website, visit your homepage, and see if you are being tracked.
If nothing is being tracked, the next step is to verify that you see your tracking code in the website’s source code.
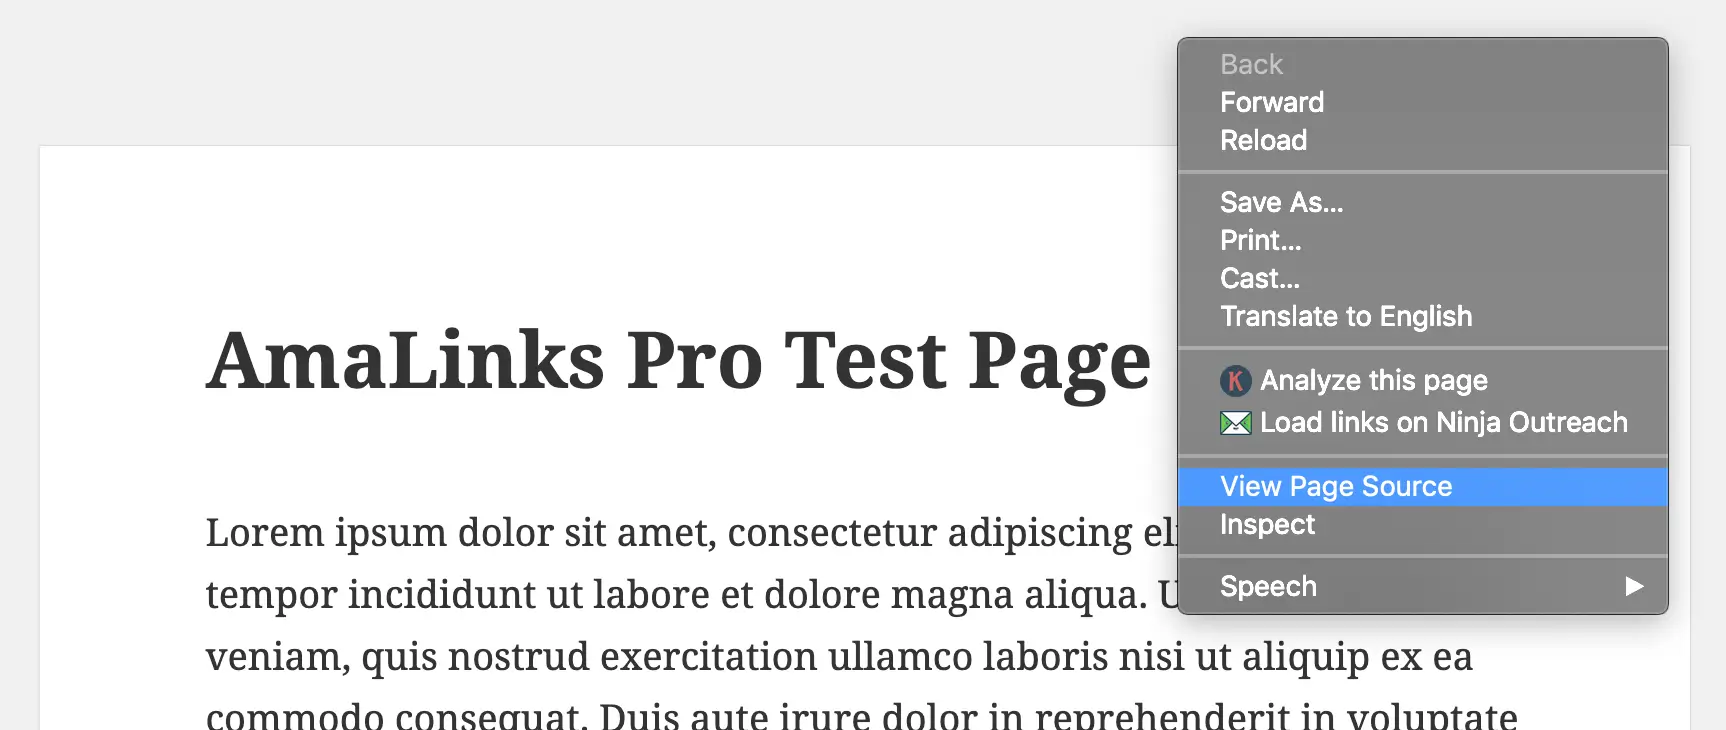
To verify if your tracking code is installed, right-click on your webpage in an open space, and click “View Page Source”
Next, look at the page of code that opened up in a new tab, and click CTRL+F (CMD+F Mac) and search for the word “google”. You should be able to find your Google Analytics tracking code that looks similar to this.
![]()
If you do not see your tracking code present in the page source, and no traffic is being recorded in real-time, please refer to the documentation of the plugin you are using to insert the tracking code or refer to Google’s own documentation.
Step 3
Step 3: Activate Event Tracking in your AmaLinks Pro® Settings
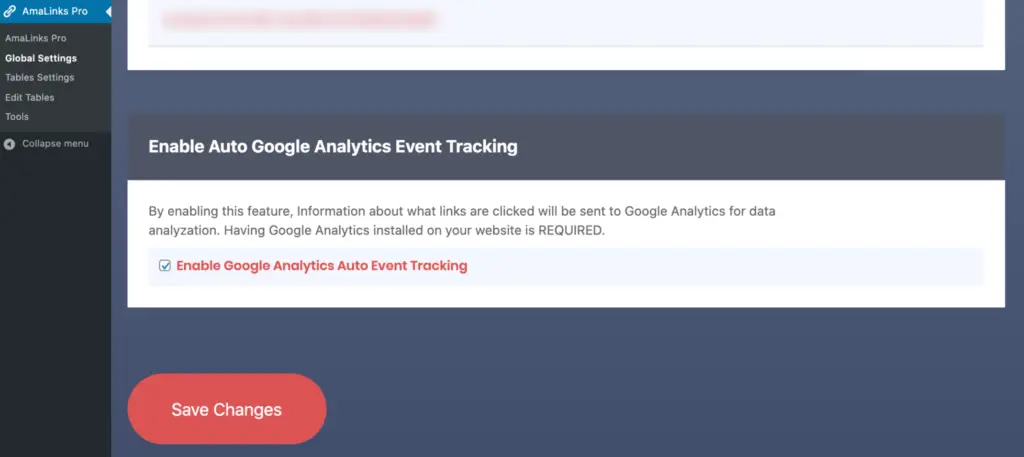
Once you have your Real-time Google Analytics working, and can see yourself in the Real-time traffic (check by looking for your location, city, etc…) go to your AmaLinks Pro® Settings Page and click on the “General” tab. If you do not see the “general” tab, your plugin may be out of date. Update the plugin and try again
Check the box next to “Enable Google Analytics Auto Event Tracking” and click the “Save Changes” button.
Now you should be all set up to test your event tracking.
Step 4
Step 4: Testing the AmaLinks Pro® Auto Event Tracking in Google
Open up a page that has either an AmaLinks Pro® text link, image link, showcase or product comparison table … and click on a link or two. DO NOT CLICK MORE THAN YOU NEED! You don’t want to send Amazon much test traffic.
Now open up your web browser page with the Google Analytics Real-time Analytics and click on the Events view.
Give it a few seconds after clicking your affiliate link, but if after say 30 seconds you do not see your click tracked in real-time, go back through these instructions to see what is wrong.
![]()
If tracked successfully, you will see events listed for your click! You will now track every Amazon Affiliate link click right within Google Analytics – enabling you to get some really awesome data on exactly what people are clicking on within your web pages.
Part C:
Learn exactly how to use event data to optimize your pages and maximize your earnings.
I think the best thing to do would to be to use our latest product review demo. This review is built using AmaLinks Pro® and our favorite page builder, Elementor. If you haven’t seen our latest review post, you’re in for a treat.
Check out our demo review post, then continue reading this tutorial …
Those of you that are AmaLinks Pro® Members already have the ability to create professional engaging reviews like that and then track exactly what links and products get the highest click-through-rates.
Those of you who are not AmaLinks Pro® members yet – we are your competition. Now you know what you are up against.
Step 1: Accessing your Event Data in Google Analytics
Let’s take a look at an example of event data that is sent to Google Analytics when visitors click my AmaLinks Pro® generated links in that review post.
Instructions for accessing your own event data:
Log into your Google Analytics account, and navigate to “Behavior > Events > Overview
![]()
In this view right here, you can see the pages that have the most AmaLinks Pro® events tracked. In our case, it is our new post illustrating the old boring review post style versus our advanced professional review template using AmaLinks Pro® & Elementor together. If you didn’t click the button above to view this demo – you really should now.
What does this information mean to you?
This tells us the best posts to dig into further to learn more about why these pages have the highest click-through-rates.
Step 2: Digging a Little Deeper – the Event Action
Let’s dig a bit deeper into our affiliate tracking with Google analytics. Now I click on the first row in the data table to see only the events from post ID #7571, our Propane Grill Review demo post. Click the link to see the “Event Action”. This is still showing us only link clicks on the page we clicked.
![]()
Now you can see exactly what types of AmaLinks Pro® links are being clicked on this page.
How does this second level of information help you?
This tells you what types of links on this post gets the most clicks.
That tells you exactly what affiliate link content your visitors are the most interested in – and you can make some page optimizations based off this.
So, what do I see here?
It looks like the comparison table in the middle of the post get more clicks than all other links on the page combined!
That’s not something you can just guess about your visitors behavior unless you track the data like this.
![]()
We’ll have to dig a little deeper to see what inside the table people are actually clicking on … and I have a theory about what people are clicking on.
Right above this table, I have the text “Click any image for more details” bounce in when you scroll to the table.
I have a feeling that this is the reason the table gets so many clicks. If we find out that the most clicked column is the image column – that will be evidence of it.
Step 3: A Goldmine of Information – the Event Label
Now it’s time to dig into the table events to see exactly what products and columns are being clicked.
The answer to our question “Are people clicking the image column a lot?” is buried here.
![]()
I click on the first row “Comparison Table Link Click” and now I can see only the link clicks within my table.
![]()
Would you look at that … my site visitors ONLY clicked on the image link! Even with such a small sample of visitors and clicks, I’m pretty confident that adding that text above my table will increase clicks on the table.
It seems like such a simple little bit of data that I just studied – but if I add that call to action text above all of my tables – it could have an instant impact in increasing my CTRs and ultimately my Amazon commissions!
I’m may to start doing that to all of my tables.
Does that mean that you should do that too for every table?
I can’t answer that for you … I don’t have the data to study to make that decision. I can’t even make that decision for myself quite yet. Although it seemed to work on this page and this table, I need to test it on other pages to see if it holds true. I now have something concrete with a trackable datapoint that I can run a handful of tests with and explore.
That’s what optimization is all about right there. Tracking detailed data points, studying them to gain insights into your visitor’s behavior and testing changes based off your best guess as to what might increase your CTR – the ultimate goal with your Amazon reviews like this.
What will I do next?
It’s great that we saw evidence of my call-to-action text above the table working, and I can make some sitewide improvements based on that information.
Also, I can to study the events on the pages I add that text to, then compare the data from an older time period to a newer time period when the table has that text above it.
If it increases the number of clicks on multiple pages – I know it works and can implement it across all my tables.
One More Piece of Important Data I see hiding…
If you look at the Event Labels, you will see that the image on row 3 got clicked more than all the rest combined.
This tells me that whatever product is in row 3 – people are more interested in that the other products in the table. I should probably write a full review on that product and add the same comparison table, but with that product as my “Top Product”
There, I have now optimized my site by adding a new review for a popular product I discovered through my event data.
I have also discovered that my call to action text I added above the table seems to be working well.
I wonder if I could move the table up the page even more to increase clicks?
Doing that might increase clicks – or annoy people so they just leave without clicking anything.
Without AmaLinks Pro® & Automatic Google Event Tracking – you can only make a guess if this move works.
I’ll be able to look at the data and see exactly if it worked or not.
If not, I put it back. If it does increase my Amazon clicks – maybe I leave it there or test another optimization. There are so many options and things I could do and test.
Part D: Ideas, Optimizations & Insights – How to Get the Most Out of your Crystal Ball
Here are a few ideas that I use, and that you can use for yourself or to help spark new ideas. There are so many things you can do, I would love to hear your tactics that work well using AmaLinks Pro®!
- I can look at a page and see if anybody is clicking on my text links – if they are barely getting any clicks, because they are all clicking on my images showcases and tables, maybe I should remove the links to reduce the affiliate links on my page, and to not distract from the higher CTR links.
- I can see if my visitors are clicking the CTA button and image link at the top of my post – if they are getting clicks, I know I am accomplishing my #1 goal of getting the visitor to click one of my Amazon links right away. These links are above the fold on most screens. Does this style of review post intro really work?
- I can see if removing the table from the post lowers or raises my page’s overall click-through-rate – I have a feeling that it would just lower my click-through-rate as most would expect, but I have been surprised with the results of my data more times that I can count. I can test it and know for sure.
- I can see if visitors are clicking on my 2 showcases on the page – if many visitors are not clicking on the buttons maybe I will remove the buttons in the showcases. Maybe they look too commercial. I still want the nicely presented information in the showcase, but maybe I’d remove the button and let people click my higher CTR links on the page.
So now you have seen some of our real AmaLinks Pro® Automatic Event Tracking in action, and we explored actual examples of what we could learn and practical ways to apply the insights we gained from the data that was collected effortlessly.
Actually, I have some experiments I’m excited to run now and I’ll make sure to share any great results I may get with all of our readers.
ACTION ITEM:
Try adding “Click any image for more details” above your product comparison tables and see if it increases your CTR!
BONUS: Comparison Table Optimizations Ideas
This article is already so long and packed with information, I was going to end it but decided to add one more unplanned section – some ideas on how you can use the event data from the AmaLinks Pro® Comparison Table Builder to optimize your pages and earn more money.
Tracking exactly how your visitors interact with your tables can help you optimize them for the highest click-through-rates possible.
Here is some ideas on what type of insights and decisions I think about when I track Amazon affiliate links in my tables. Please use them for yourself and come up with your own great optimization ideas.
- I can look at a table and see what products are the most popular – maybe I will add a table with 10 products, then track it over time and optimize the table by only keeping the products with the 5 highest click-through-rates. I’ll keep these as my table’s top 5 products, and I could add 5 more to see if any of the new products outperformed the original 5. By repeating this pattern I wold end up with 5 – 10 of the most popular products in my table.
- I can link every column to see what gets clicked the most – if nobody clicks my product title column, i can remove the link from that column. Does the image column get the most clicks? I can easily find out..
- I can see if the table gets more clicks in the middle or end of the post – I used to always add the comparison table to the end of every post, but am I really sure that this is the best placement? I did try putting tables higher up in the middle of the post, and they get great results. I still need to run more tersts before deciding what works best for me.
- I can test product popularity before choosing products to review in full – all I have to do is set up a table with ten products, send over time the most popular products will be clear winners with the most clicks. These are the popular products that you should write full reviews on. They also make great product showcases to insert in any relevant page or post that could use a cool product callout.
My Final Word on Event Tracking and AmaLinks Pro®
As you can see – the possibilities are endless. This article only scratches the surface of how to track amazon affiliate links with Google Analytics however…
All of the ideas on this page can be done without using AmaLinks Pro® if you know how to set up event tracking for all of your own links, but it gets complicated and time consuming to say the least. Amazon Affiliate link tracking can be cumbersome and time consuming.
You can set this up by coding some javascript to send the event data to Google, or you can set up event tracking on Google Tag Manager – but both of those require that you know a lot of information to get set up and manage it.
That’s CRAZY and a waste of time.
Instead, just use AmaLinks Pro® – where it is all designed to work automatically with zero setup other than having Google Analytics installed and activated on your website already.
I sincerely hope this post helps you with your Amazon affiliate analytics, AmaLinks Pro® customer or not.
~ Alchemy Coder