 Chapter 3 – Creating Content for your Amazon Affiliate Website
Adding content to your website will be one of your main tasks for a long time, probably almost as long as you want to keep the website.
Creating content does not have to be hard. Sure mastering keyword research, online user psychology, and a whole other set of skills can help – but you can learn and apply all of that later.
This guide will help you get some high-quality content up quickly.
Highest. Quality. Content. Only. Would you spend time reading and interacting with your own content? Be truthful with yourself. Only create content that is up to your own standards or even better.
People these days have a lot of high-quality options, you need to do your best. Trust me, mediocre content gets less than mediocre results. It takes great content to get great results.
Mediocre content gets less than mediocre results.
I’ve tried lower-quality content many times on many websites. Even when it works, it only works for a while. When you spend your most valuable resource, your time creating content – you want it to be around as long as possible!
Your content must be valuable and well presented or your visitors won’t click your affiliate links very often and Google won’t send you traffic. It’s that simple.
* This tutorial includes some affiliate links. If you click an affiliate link and make a purchase we will receive a commission at no extra cost to you. We personally use and recommend every product and service we link to.
We’re going to start off by adding some basic pages that all websites should have. These are basic pages that people are familiar with. Having these pages will give Google and your visitors a sense of trust and legitimacy.
There are a handful of standard pages that an Amazon Affiliate website needs. These pages are pages that visitors expect, Google wants to see, and help instill trust with your readers, which equates to them clicking on your affiliate links.
Here is a basic sitemap to follow. Add these pages to your website
If you need a beginner tutorial on how to create a page in WordPress, use this tutorial. You will be using the WordPress Block Editor, and if you need instructions for using the block editor with Genesis Blocks, you can access some tutorials here and here.
Your homepage should not be a list of all your posts, we are going to make it a static page with at least 500 – 1000 words. Here is an easy template that you can follow to build a simple effective homepage.
We will be using the Block Editor & Genesis Blocks to build a great-looking and effective homepage. Your homepage will be an overview of what your website offers and will have many gateways into deeper content for your visitors to get lost in until they click your Amazon affiliate links.
Section 1
* Try not to get hung up on using the advanced block editor settings, keeping it simple and basic Headings, images, paragraphs, and links is completely acceptable. You can update your content at a later time after it is up and running.
Use a nice background image, your website name, a tagline, & a Call-to-Action button leading to one of your best articles. (which you will create later)
Section 2
A 200 – 400 word intro about what your site is about and how it will be valuable for the reader.
Section 3
Use a three-column layout, and each column will have an image, title, description sentence, and a link. We will link these later to some of your articles and other pages.
Now that you have a homepage created, you have to go into the WordPress Settings under “Settings > Reading” and set your homepage to be a static page, and choose your homepage. Here is a tutorial.
Your if anybody reads your about page at all, they will want to know about how your website will help them. A high-performance about us page informs the reader how we will help them with our valuable content.
Make this page 300 – 500 words long. Talk about how your content will help them. This will suffice for now, you don’t want to spend too much time on the about page because we have more important content to create! You can always come back later when you have more time and make the page better or more comprehensive.
Your website needs to have a contact page because Google likes to rank “real” businesses, and a contact page is a sign that you are a real person or entity.
All you need is a very simple contact page. Add a page with an intro paragraph that says something like “Thank you for visiting our website. If you have any questions or comments or just want to say hi, fill out our short form!”
Then you will add a simple contact form with Ninja Forms. This tutorial teaches you how o create a form and add it to your contact page.
A privacy policy page is another important ‘trust factor’ for Google and your visitors. Many locations have laws requiring you to have a privacy policy, but even if you do not have to your readers will appreciate it if you take their privacy seriously and are transparent about how you treat their data.
Don’t worry, it’s not as scary as it might sound. You can use a privacy policy generator such as https://getterms.io/policy/website-free or use one of the choices at https://digital.com/privacy-policy-generators/
Create a new page called Blog. Next, just like the homepage, go into the WordPress settings under “Settings > Reading” and set your Posts page to your new blog page. Here is a tutorial.
We are going to be creating 3 blog categories to start with to keep it simple. Here is a tutorial on setting up blog categories in WordPress.
Create these 3 categories:
Now that you have your basic pages and blog structure set up, it’s time to talk a little about Search Engine Optimization. Commonly referred to as SEO.
Search Engine Optimization is important so Google and the other search engines rank your websites high in the results.
In order for your pages and posts to attract traffic naturally through Google and other search engines, they have to be optimized to stand the best chance of ranking well and getting your organic traffic.

RankMath is great because it is very easy to use when writing your posts in the WordPress admin.
Here is a tutorial on How to use RankMath to Optimize your posts. Read over that whole tutorial before you proceed to the next section, writing your blog posts which is where most of your website content will be.
* Don’t worry about SEO and using RankMath on the basic pages you already created, you can go back and edit those later. Those pages won’t attract a lot of search engine traffic, but the posts we are about to write will, so SEO is important moving forward from this point on in creating your content.
TIP: Don’t get hung up using RankMath to optimize while you write your posts. You can go back making edits if it is easier.
Another aspect of Search Engine Optimization I want to mention, for now, is internal linking. It helps your users and the search engines when you link relevant text and keywords to related posts and pages. It helps them find related content.
For example, if you have a product review on camping tents, you should link to it from an informational article that mentions camping tents.
For now, when you write your blog content, keep internal linking in mind, link to another post when appropriate, and we’ll come back to this after you have a few posts. At that point, we will use the Link Whisper plugin to review and edit our internal links.
This will be your first blog article. Google loves websites that provide valuable useful content, not just affiliate links and product reviews.
It’s important that a large percentage of your website is informational posts instead of product reviews. This keeps your website more valuable to your readers, which Google likes and rewards you for.
You will be adding Amazon affiliate links to your informational pages as well.
Informational articles will make up a large part of your website.
Long articles filled with detailed information are great to attract organic traffic through Google, and often get visitors years after they are created.
Informational articles are very easy to monetize as well. Product placements using your Amazon affiliate links are easy to mix in naturally. People click naturally placed Amazon affiliate links within informational articles a lot.
If you remember, one of our requirements for our website topic was that there are a lot of sub-topics that you can write articles about.
Here is where that applies!
 Come up with a topic & title for your first informational article.
It should be easy to come up with your first topic, and instead of doing time-consuming complex keyword research, you are simply going to view a few other successful websites in your topic (a requirement for the topic!) and choose a topic that is commonly written about.
Example: If my topic was ‘camping’, I would visit some camping blogs and browse the blog titles for ideas. I see a few articles about ‘tips for camping with kids’ – so that would make a great topic. Or maybe ‘camping with pets’. Or ‘Learn about the different types of camping’.
These are all topics I see other camping blogs writing about.
Now that we have a topic and a title in mind, it’ time to create the page and add some content.
For those who need it, here are instructions on how to create and add to a ‘post’ in WordPress. Once you complete that, here are a set of guidelines to follow to make sure your content is robust, scannable, and well presented for the internet.
This gives the readers an easy way to know if this article will match their expectations. Summarize what your article topic is about in 2 – 4 sentences as an article intro.
The best way to get visitors to your Amazon Affiliate website is by writing content that Google ranks well in the search results. Content length has been studied a lot, and the bottom line is Google loves long useful content.
1,000 words is the bare minimum your informational article needs to be. Anywhere from 2,000 – 3,000 words would be ideal.
Writing a longer word count without accidentally plagiarizing can be a bit of a challenge. You could also use a paragraph rewriter to rephrase things to ensure you’re good to go.
When writing an article for online consumption, you have to keep in mind that people visually ‘scan’ a web page looking for what they expect to find – way more than actually ‘reading’ it all.
One way to make your content more scannable is by adding plentiful headings. A 2,000-word article could easily have four Heading 2, each of those having 2-4 heading 3, and maybe a few Heading 4 sprinkled in where appropriate.
Adding a bulleted or numbered list is another great way to make your article scannable. You can even add a quick list of your article’s main points at the bottom if there are no lists you could make about your topic.
Linking to outside resources shows Google that you are a part of the wider internet community, and builds trust with your users as well. Also, there is a ton of great resources out there to share with your readers!
At the very least, images break up the article visually and make it more pleasant & interesting for your visitors. Images can also convey very important information or set a mood. Don’t underestimate the power of great images on a web page.
Here are a few free stock image websites to find images at:
Make sure to upload a featured image. This image is used within the archives and templates, and remember that great images are very powerful to have on your website to create the mood that gets people clicking your affiliate links. Here is a tutorial if you don’t know how to add a featured image to your posts.
Use SEO Surfer to write your content. I personally use and love this option. Every established older piece of content I optimized using it saw improved rankings right away, and my new content written using SEO Surfer’s Content Planner ranked well right from the start.
I found out that SEO Surfer does not work for every single article I tried it for, it depends on the search results returning good results. It did work great for most articles and especially for new articles, I was writing.
NOTE* SEO Surfer is a paid service.
Here is a tutorial on how to use SEO Surfer on their own blog: https://surferseo.com/blog/how-to-use-content-editor/#toc-write-in-content-editor
Matthew Woodward also has a great tutorial on how to use SEO Surfer: https://www.matthewwoodward.co.uk/seo/reviews/surfer-seo/
 Now let’s take a look at writing a product review. This is another great type of content for an Amazon affiliate website. First, a product review is great for funneling your website visitors to from your informational articles.
Second, product reviews attract people to your website that are close to buying the product, so giving them as much information as possible and encouraging them to click your links can work great.
Your job is to give them all of the information they could possibly need before making that buying decision. If you do it right – they won’t need to leave your site and search other sites for more information. They’ll get the info and data they need from you and then click on one of your affiliate links to make the purchase!
You will often see two main types of product reviews online.
This is the preferred way to create a product review. Buy and try each product you review to give an honest real review. The main benefit of this method is that your visitors will trust your recommendation more because you have actually used the product.
This is your angle to get visitors clicking your affiliate links: trust in your honest real-life recommendation.
So how do you write a product review for products you have never used? Can you even write a trustworthy review if you have not used it? You sure can!
You just have to come from a different angle. Instead of earning your visitor’s trust with your recommendation – you provide them with enough gathered information to save them time in researching the product.
This is your angle to get visitors clicking your affiliate links: providing thorough valuable researched content to save them time.
DO NOT PRETEND to have used products you haven’t. Visitors are savvy and can tell bullshit when they see it. All this will do is dissuade them from clicking your links. Just don’t do it – there is no need to.
 Instead, use this product review template to offer as much value as possible. This product review template works great for reviewing products you have never used.
It provides every last bit of information a potential buyer could possibly want and it offers MANY opportunities to insert well-placed Amazon affiliate links. I’m telling you – it would be nearly impossible for a reader to not click on at least one of the Amazon affiliate links and get that 24-hour Amazon affiliate cookie set for you.
* IMPORTANT! Do not copy/paste any content when writing your review. Rewrite or paraphrase everything in your own words. The review has to be original and high-quality for Google and your visitors to pay attention.
Intro Paragraph – Start with a sentence or two about your overall topic and how this product fits into the picture. This goes right underneath the Heading 1 title.
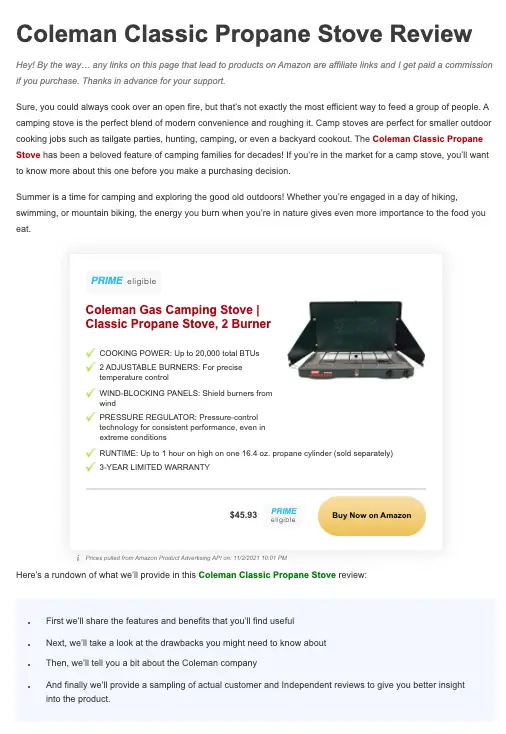
Check out this real product review example post on the AmaLinks Pro® site. Keep in mind that this example is already monetized with AmaLinks Pro®. Your product reviews will not have any of the Amazon affiliate links and product displays until we monetize your product review in the next chapter.
Writing his content will be easy and is a great way to cover a lot of products on your website, and it’s easy to write just a little about each one. Choose ten products on Amazon that you will write about. Make a list and write them down.
Here is our basic template.
Create a Title: See our Top Ten 4-Person Camping Tents
Create an Introduction: Explain that you will be taking a quick look at ten different 4-person tents
(Product Comparison Table: We will be adding this later when we monetize the post)
Add Custom Product Descriptions: Add the product name and 100-150 words about each product you have chosen, and a regular link to the product on Amazon. (We’ll be monetizing it in the next chapter and will replace this link.)
Here are a few examples of Top Ten posts for inspiration. Don’t worry if they are a bit complex, you will be creating simple top ten lists at first.
This chapter doesn’t end here.
Adding content to your website whether you write it or somebody else does is one of the main activities you will be doing for the rest of your Amazon affiliate website’s life. Google only likes up-to-date relevant content, so you have to keep the content faucet flowing.
This chapter covered three types of content, an informational article, a product review, and a top ten style list. There are many other types of content you can create, and even many ways to alter these three types.
Although you will be completing 2 more chapters to complete your high-performance Amazon affiliate website – you should be creating more of these content posts and other types on a regular basis.
The content creation never ends! That’s the bulk of your work for a website that earns a lot of money.